


I think most homes have at least one yard access gates. They range in design and size but one thing is almost certain. Over time gates tend to hang up or drag on the ground and drive you nuts! There are some things that can be done to try and save the gate. However, in my experience they are usually too far gone to bring back to life. When it’s time to get a new gate put in make sure you do it right! The number one reason for gate failure is improper construction, more precisely the gate frame is not built correctly.
This blog is going to cover some of the most common gate frames you will see here in our area and why they last or fail prematurely. There are some gates I have replaced that are 30 years old and not had many issues. On the other hand, some have been less than 5 years old and already dragging. Hopefully this blog will help you on your next gate build or keep an eye out when you have one replaced. Over time every gate will sag, but we should do our best to keep that as far down the road as possible.
Wood Frames
Wood framed gates are by far the most common. This is mostly because it is the building material for the rest of the fence. Although there are several variations, there are three popular designs in our area. Just as a note of preference, I never build gate frames from pressure treated lumber. The lumber is usually very wet and as it dries it tends to warp. The warping frame then distorts the gate and issues arise from the get go. All my gates use dry redwood frames. Although more expensive, they look nicer and do not warp like pressure treated frames.
Z Frame
A Z-frame yard gate is by far the most common. One reason is because it is very quick to construct, especially when using a nail gun. I saw a gate built and installed in less than 15 minutes at a home once and it blew me away. The second reason is because if built correctly it will give the gate a long service life. So, what is the right way?
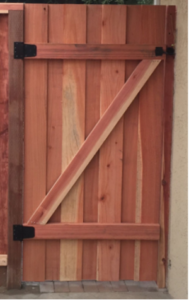
The correct way to build a Z-frame gate is to have two horizontal boards to which the hinges attach and a diagonal cross bar that starts at the top of the gate latch side to the bottom hinge side of the gate. The placement of the diagonal bar is crucial for longevity especially as the gates get wider. Why is this placement so important? Over time the end of the gate starts to sag. As it tries to sag the downward force transfers through the diagonal bar and into the bottom hinge attached to the post. The post is not going to move so it helps support the entire gate for many years. This picture is of a correctly built Z-frame gate.
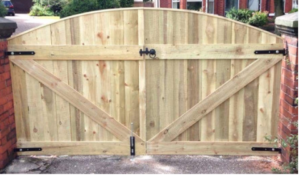
If the diagonal bar is installed with the top starting at the hinge and ending at the bottom edge of the gate it offers little support to prevent the gate from sagging. The only items holding the gate from sagging are the nails or screws the gate was built with. Over time with changes of weather the fasteners start losing their hold on the material and it begins to sag. This is the most common mistake I see with Z-frame gates; the diagonal bar is incorrect. The double gate shown in the photo has both gates with the diagonal placed incorrectly. These gates look good new but in a few years, will start running into problems. One issue with the Z-frame gate is that is relies on the fence pickets to hold the shape and structure of the frame.
Full Frame
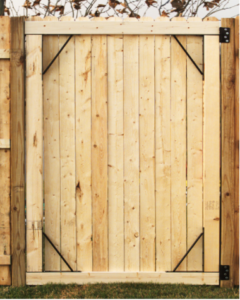
Full frame gates are not as common as Z-frame gates but last longer than simple Z-frames. This is the type of gate I build for my customers (see photo). They take more time to build but the customers gets a better looking and longer lasting gate. A full frame gate incorportes the strengths of the Z-frame gate but it also includes two vertical pieces. The benefit to this gate frame is that is does not rely solely on the fence pickets to hold the shape of the frame. In this design the frame is constructed first as a solid rectangle and then the pickets are added on. The pickets really help to tie it all togethofrrer.

Horizontal Bar
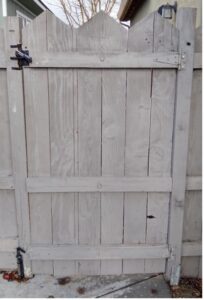
This is the least common gate frame and is used mostly by new constrction home builders from what I have seen. As you can see it is the simplist and easiest gate to build. It is also the worst gate design in regards to longevity and strength. This gate style simply uses three 2×4’s across the gate width that are not tied to eachother. There is no full frame or even a diagonal brace to suport the weight of the gate. The nails holding the pickets to the bars are the only things prevening the gate from sagging. Within a couple years time and weather changes the gate starts to shift and sag. This grey gate pictuered was from a customer who’s home was less than 5 years old. The gate was already dragging on the concrete walkway pretty bad. This type of gate design should never be used. It would have been just as easy to do a Z frame and make the gate last many more years.
Steel Frames
Besides wood frames there are a couple off the shelf options for steel framed or steel supported gate frames. Some benefits of using the steel frames are easy gate construction and gate longevity. There are two common kits available and I have used both but prefer one over the other.
Easy Gate
Option one is called the Easy Gate. True to its name it is quite easy to build a gate using this kit. The kit consists of 4 corner metal brackets. All you have to do is cut 2×4’s to the height and width you need and you are on your way. This system creates a full frame for the gate. The 2×4 are attached to the corner braces with provided screws. However, I would not use the provided hardware as they will tend to snap off. It is better to use exterior wood screws. Another benefit to this kit is that the gate hinges are actually part of two of the braces. This makes it easier to attach to the post. The one downfall I have found with these kits the few times I have used them is that the brackets are not made perfectly at 90 degrees. This make it very frustrating to make a square gate and actually does not allow the gate to be square as the pieces conform to the frame. The second issue I have found is that the hinges are not welded on straight and causing problems mounting it to the post. Lastly the corner braces do not allow a diagonal brace to be added to the gate. In conclusion I would recommend staying away from this kit.
Adjust-A-Gate
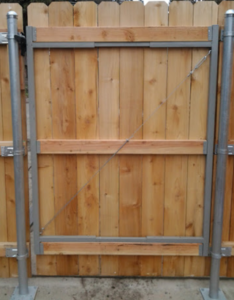
Another popular gate frame kit is the Adjust-A-Gate system. This frame design is much better than the Easy Gate. The company also promotes that this kit can be used for gates up to 6’ wide. The gate kit consists of a full steel frame including the horizontal supports. Building a gate with this kit is very easy. All that has to be done is to cut 2×4’s to the desired width and slide them into the supports on the frame. Screws are then attached through the steel frame to the 2×4 to keep everything rigid. To help keep the gate square upon construction the company includes a steel cable kit. Using a steel cable is another way to prevent a gate from sagging over time. When using a cable, it should be attached opposite of how a wood brace is installed. The cable runs from the top hinge down to bottom corner of the gate. As the gate starts to sag over time the cable tightens up and prevents it from falling any more. I have used this kit on several large gates, typically over 4’ wide. The one downfall of this kit are the hinge connections that come with the kit. Unlike typical gate hinges that mount to the front or back of the post, these hinges mount on the face of the post. This causes a large gap between the post and gate frame. That is why this kit is designed for gates that open inward. This prevents the pickets nearest the hinges from binding up. However it can be used for outswing gates as well but requires a little more modification.
In conclusion, gates can be constructed in a variety of different ways as we can see. The most important part of the gate is a frame that prevents it from sagging. Hopefully this blog has introduced you to several variations and gives you confidence to tacked your next gate project!
